Mar 15, 2018
Series: Developers guide
This post continues the exploration of Quentier’s internals: here we’ll talk about the implementation details of Quentier’s local storage.
As I mentioned in the brief technical overview post, the local storage within libquentier uses SQLite as its backend i.e. all the data downloaded from Evernote (or user’s own data in case of local account) is stored within a SQLite database. However, it is just an implementation detail: the fact of SQLite usage is completely opaque to any clients of local storage functionality within libquentier. So in theory is is possible to change the database backend in future to whatever one is considered better - even to storage of plain files within some folder. Internally SQLite is used through Qt’s QtSql module.
Libquentier provides both synchronous and asynchronous versions of local storage management - which correspond to LocalStorageManager and LocalStorageManagerAsync classes within the public libquentier API. The asynchronous interface offers signals and slots for asynchronous communication with the local storage for clients. In Quentier local storage operations run within a separate dedicated thread of execution so the communication with the outside world via signals and slots is truly asynchronous. As such communication is asynchronous, each signal and slot involved has a special parameter of type QUuid which is called requestId in most cases. This identifier allows the clients of local storage to identify which particular signal from the local storage is the response to their query i.e. to the invokation of some LocalStorageManagerAsync’s slot - the response signal would have the same request identifier as the one passed to the slot.
LocalStorageManagerAsync maintains the in-memory cache of several most recently added/updated/looked up data tems following the assumption that these items would be quickly accessed again. At the time of this writing there’s no collection of cache hit/miss statistics although it would be nice to implement it in order to see how useful that in-memory cache really is. Note that this cache is not the same as the in-memory cache of data maintained by SQLite itself - SQLite’s in-memory cache is completely opaque to the code requesting stuff from the database; LocalStorageManagerAsync’s cache is only opaque to its own clients. Libquentier’s API makes it possible to disable LocalStorageManagerAsync’s cache by calling setUseCache(false) on LocalStorageManagerAsync instance. Libquentier also allows one to customize the cache expiration function by passing an object of a custom subclass of ILocalStorageCacheExpiryChecker to LocalStorageManagerAsync’s installCacheExpiryFunction method. The methods of this class evaluate when it’s time to drop the least recently used data items from the cache.
More involved interface for working with the cache is accessible with the help of LocalStorageCacheManager class the const pointer to which can be retrieved from LocalStorageManagerAsync via localStorageCacheManager() method. The returned pointer would be nullptr if the cache was disabled.
LocalStorageManagerAsync acts as a wrapper around synchronous LocalStorageManager class so its role is to implement the asynchronous interface around the synchronous one and also to maintain the cache of most recently used data items.
LocalStorageManager’s interface is pretty self-explanatory and also contains quite complete Doxygen documentation: it offers the ability to add/update/search/remove/list (with limit, offset and sorting order) notes/notebooks/tags/saved searches/resources (attachments to notes).
Now some info about the private implementation of local storage management.
First, if you not familiar with pimpl idiom, you can read about it here. In C++/Qt/KDE the pattern is also known as d-pointer. Pimpl idiom is the way in which private local storage management implementation is hidden from the clients using the API. Is it a pretty standard pattern for shared libraries intended to prevent the breakage of ABI due to internal implementation changes.
In context of local storage management public LocalStorageManager class has a single pointer to its opaque implementation class: LocalStorageManagerPrivate:
QT_FORWARD_DECLARE_CLASS(LocalStorageManagerPrivate)

class QUENTIER_EXPORT LocalStorageManager: public QObject
{
    Q_OBJECT
public:
    <...>

private:
    QScopedPointer<LocalStorageManagerPrivate>  d_ptr;
    Q_DECLARE_PRIVATE(LocalStorageManager)
};
This private class is declared in src/local_storage/LocalStorageManager_p.h (and the implementation is within .cpp file with the same base name). The same approach is used for the implementation of LocalStorageCacheManager, it is declared in src/local_storage/LocalStorageCacheManager_p.h. The actual implementation of the cache is not very simple: it uses multi-index container from boost library and one of indices is the last access timestamp. It might be a little overkill compared to some simplistic LRU cache based on a map and a linked list but several other indices are used as well so it won’t be just a single key map anyway.
The contents of LocalStorageManagerPrivate class (the one declared in src/local_storage/LocalStorageManager_p.h) are rougly as follows:
* public methods repeating those specified in the public interface of LocalStorageManager class - these are the methods to which the control is handed over by the public class’ methods
* private methods
* private class members
Let’s start from one single private method which provides the most important information about how the local storage database is organized: createTables. This method is called every time the account is switched as well as when the local storage manager is created for some particular account. However, this method only really does real work just once, when the account is created for the first time because in this case the tables within SQLite database are actually being created. All the next times their creation is simply skipped. Here’s a simple example of what happens within createTables method:
res = query.exec(QStringLiteral("CREATE TABLE IF NOT EXISTS Users("
                                "  id                              INTEGER PRIMARY KEY     NOT NULL UNIQUE, "
                                "  username                        TEXT                    DEFAULT NULL, "
                                "  email                           TEXT                    DEFAULT NULL, "
                                "  name                            TEXT                    DEFAULT NULL, "
                                <... more rows here ...>
                                ")"));
errorPrefix.setBase(QT_TR_NOOP("Can't create Users table"));
DATABASE_CHECK_AND_SET_ERROR();
Each table has some column serving as the primary key. For most tables such column is called localUid. It is the complement for Evernote’s guid - globally unique identifier. Guids are assigned to data items by Evernote servers, not by the client apps. So if Quentier was to rely on guids as primary keys, it would have to contant Evernote servers each time a new note or notebook or tag or saved search or note attachment is created. Doing so would effectively kill the ability to work with the notes within Evernote account offline. So the local storage uses the unique key of its own - localUid or local unique identifier. This key is not sent to Evernote during the synchronization so only libquentier’s client apps know about its existence. Local uid is primarily used to support data items both already synchronized with Evernote and not yet synchronized. In local accounts data items are not synchronized with Evernote at all so they would need some kind of unique identifier anyway.
Some tables have columns referencing other tables’ columns - those are subjects to foreign key constraints meant to help maintain the integrity of the database and reject attempts to do something which, if performed, would leave the database in some inconsistent state. One example of such a constraint is as follows:
res = query.exec(QStringLiteral("CREATE TABLE IF NOT EXISTS Notes("
                                "  localUid                        TEXT PRIMARY KEY     NOT NULL UNIQUE, "
                                "  guid                            TEXT                 DEFAULT NULL UNIQUE, "
                                "  updateSequenceNumber            INTEGER              DEFAULT NULL, "
                                <... more rows here ...>
                                "  notebookLocalUid REFERENCES Notebooks(localUid) ON UPDATE CASCADE, "
                                "  notebookGuid REFERENCES Notebooks(guid) ON UPDATE CASCADE, "
                                <... more rows here ...>
                                "  UNIQUE(localUid, guid)"
                                ")"));
errorPrefix.setBase(QT_TR_NOOP("Can't create Notes table"));
DATABASE_CHECK_AND_SET_ERROR();
The foreign key constraints for notes mean that they should only contain notebook local uid and/or guid which are present within the notebooks table. Otherwise it won’t make sense - note says it is from a notebook which doesn’t exist! The database which allowed that to happen would have to be considered corrupted. Possibly it could be repaired by manually creating such a notebook but it’s not something the user of the app would be happy to do so it’s better to prevent the possibility of such corruption altogether.
Notice that the specification on notebook local uid and guid columns is ON UPDATE CASCADE and not ON UPDATE CASCADE ON DELETE CASCADE. The latter one would mean that the removal of a notebook should lead to the removal of all its notes but unfortunately this ON DELETE CASCADE interferes with specific kind of updates within notebooks table - the updates of INSERT OR REPLACE form. Apparently SQLite thinks that REPLACE corresponds to DELETE followed by INSERT. So on the update of a notebook it would delete the notebook and all the notes inside it and then insert the notebook back. But not the deleted notes.
In order to prevent that, another way to maintain the consistency on notebook removal has been implemented:
res = query.exec(QStringLiteral("CREATE TRIGGER IF NOT EXISTS on_notebook_delete_trigger BEFORE DELETE ON Notebooks "
                                "BEGIN "
                                "DELETE FROM NotebookRestrictions WHERE NotebookRestrictions.localUid=OLD.localUid; "
                                "DELETE FROM SharedNotebooks WHERE SharedNotebooks.sharedNotebookNotebookGuid=OLD.guid; "
                                "DELETE FROM Notes WHERE Notes.notebookLocalUid=OLD.localUid; "
                                "END"));
errorPrefix.setBase(QT_TR_NOOP("Can't create trigger to fire on notebook deletion"));
DATABASE_CHECK_AND_SET_ERROR();
This trigger would be executed before the actual permanent removal of a notebook and would ensure the related tables stay consistent by removing those of their rows which reference the about to be deleted notebook.
In addition to “usual” tables there are also some virtual tables for efficient searching of stuff within the database. For example:
res = query.exec(QStringLiteral("CREATE VIRTUAL TABLE IF NOT EXISTS NotebookFTS USING FTS4(content=\"Notebooks\", "
                                "localUid, guid, notebookName)"));
errorPrefix.setBase(QT_TR_NOOP("Can't create virtual FTS4 NotebookFTS table"));
DATABASE_CHECK_AND_SET_ERROR();
FTS4 is one of SQLite’s implementations of full text search. Although it’s not of much importance in 2018, some Linux distros used to ship Qt4 versions with SQLite containing only FTS3 implementations - such versions of Qt4 won’t be suitable for libquentier - it would compile but tests won’t pass and in general things won’t work. So if you are building libquentier with Qt4, it is strongly recommended to run libquentier’s tests to ensure they pass and hence Qt’s SQLite supports FTS4.
Other private methods of LocalStorageManagerPrivate class serve as implementation pieces of public methods. These private methods can be roughly categorized as follows:
* methods running INSERT OR REPLACE queries which are used by methods adding items to the local storage as well as by methods updating items within the local storage
* methods running SELECT queries which are used by methods listing or searching items within the local storage
* methods preparing INSERT OR REPLACE queries - more on this in a moment
* other auxiliary methods
Preparing a SQL query roughly means converting it from a human readable string into SQLite byte code. For certain types of queries it is easy to do the preparation step once and then run the prepared query over and over again which results in removing the duplicate work each time the query needs to run. For this reason INSERT OR REPLACE queries are prepared once and then run several times until the account is switched or until LocalStorageManagerPrivate class is destroyed (when Quentier is shut down, for example). The data members of LocalStorageManagerPrivate class corresponding to these queries look like this:
QSqlQuery           m_insertOrReplaceSavedSearchQuery;
bool                m_insertOrReplaceSavedSearchQueryPrepared;
The bool serves for checking whether the query has already been prepared or not.
That wraps up the introduction to the local storage management internals of Quentier. Due to the fact the code performing this management lives within libquentier library, other applications can also make use of this code which, together with libquentier’s synchronization abilities, can enable other apps to easily perform full and incremental sync of Evernote account data to the local database.
Jan 19, 2018
Series: Developers guide
Updated 2019-05-03
Table of contents
Introduction
Quentier has a fair share of dependencies and their installation is a complex enough procedure, especially on Windows platform. This post explains some details of the process.
Dependencies
First let’s just enumerate the dependencies:
Quentier itself depends on just a few Qt modules:
- For Qt4: QtCore, QtGui
- For Qt5: Qt5Core, Qt5Gui, Qt5Widgets, Qt5LinguistTools
Quentier also depends on the following libraries:
Although it is theoretically possible to use different Qt versions to build Quentier and its dependencies, it is highly not recommended as it can cause all sort of building and/or runtime issues.
Libquentier’s dependencies are as follows:
- For Qt4: QtCore, QtGui, QtNetwork, QtXml, QtSql, QtTest + QtDBus on Linux platform only + optionally (although required for using libquentier along with Quentier app) QtWebKit
- For Qt5: Qt5Core, Qt5Gui, Qt5Widgets, Qt5Network, Qt5PrintSupport, Qt5Xml, Qt5Sql, Qt5Test, Qt5LinguistTools + Qt5DBus on Linux platform only + optionally (although required for using libquentier along with Quentier app) either Qt5WebKit and Qt5WebKitWidgets or Qt5WebEngine (and Qt5WebEngineCore for Qt >= 5.6), Qt5WebEngineWidgets, Qt5WebSockets and Qt5WebChannel
- libxml2 - for validation of Evernote’s ENML note formatting against the DTD
- OpenSSL - for encryption and decryption of note fragments as well as for Qt’s usage of secure networking. Note that ssl/crypto libraries built into OS X / macOS by Apple don’t contain the required encryption/decryption API and are therefore not suitable for building libquentier - you would encounter build errors if you try to use those built-in libraries. OpenSSL from Homebrew or Macports would be suitable
- Boost - some header-only libraries are used, mostly multi index container and bimap
- libhunspell - for spell checking within the note editor
- QtKeychain - for reliable storage of various Evernote service’s tokens which shouldn’t be stored in clear text
- QEverCloud - for low level communication with Evernote service
- libtidy5 from tidy-html5 - for assistance in the conversion between HTML and ENML representations of notes. Note that the old libtidy 0.99 still shipped with many Linux distros won’t be suitable!
- For Qt4 builds only: qt4-mimetypes - backport of Qt5’s mime types handling to Qt4
- Optionally: Doxygen (for automatic generation of documentation)
In addition to this, libxml2 might depend on libiconv and zlib.
On Linux and Mac at least several of these dependencies can be installed via package managers. On Windows there are several package managers as well, however, they weren’t evaluated for being useful for installing Quentier’s dependencies. Instead, some Quentier’s dependencies for Windows can be downloaded from the Internet and others can be built and installed manually. Some of Quentier’s dependencies require a couple of minor patches to support proper building on Windows.
Instead of (or in addition to) reading this tutorial you can look at Quentier’s Travis CI configuration file which installs and builds the necessary dependencies on each Linux and Mac CI build and at AppVeyor configuration of a separate repository set up for the sole purpose of building Quentier’s dependencies on Windows and uploading them to the continuous release from where they can be downloaded.
Linux
It’s hard to write the detailed guide for every possible Linux distribution as there are so many of these so this section will use Ubuntu and apt-get for the sake of example. For other distributions simply use the distribution’s native or your preferred package manager and correct the package names accordingly.
First need to make sure the basic development tools are installed:
sudo apt-get install build-essential cmake git doxygen
Then let’s install Qt. Since libquentier and Quentier support building with both Qt4 and Qt5, you can install either version you like more. Here’s the command to install Qt4 libraries:
sudo apt-get install libqt4-dev libqt4-dev-bin libqt4-network libqt4-xml libqt4-xmlpatterns libqt4-sql libqt4-sql-sqlite libqt4-test libqt4-dbus libqt4-webkit
For Qt 5 the equivalent would be the following:
sudo apt-get install qtbase5-dev qttools5-dev libqt5webkit5-dev
Notice one important detail which is specific to Debian, Ubuntu and all distributions derived from them (with the exception of KDE Neon and possibly some others): the official distro’s repositories would probably not contain QtWebEngine which is one of two potential backends of note editor within libquentier. So in these distributions you can only build libquentier with QtWebKit note editor backend unless you use Qt built manually or installed from somewhere else than the distro’s official repository. Such unofficial Qt repositories exist, they contain QtWebEngine and you can perfectly use it to build libquentier and Quentier. In fact, Quentier uses one unofficial Qt version on Travis CI for packaging into AppImage. Stephan Binner does a great job of setting up launchpad repositories with various Qt versions for different versions of Ubuntu. Feel free to use them. However, bear in mind that if you use unofficial Qt, you’d need to build QtKeychain with that Qt version instead of installing it from the official repository. It’s not hard to do and will be explained below.
If you use the distro’s native Qt4 version, that’s how you install QtKeychain on Ubuntu:
sudo apt-get install qtkeychain-dev
If you use the distro’s native Qt5 version, you can install Qt5Keychain as follows on Ubuntu:
sudo apt-get install qt5keychain-dev
If you use some unofficial Qt5 version, you need to build Qt5Keychain from source. Here’s how it can be done:
git clone https://github.com/frankosterfeld/qtkeychain.git
cd qtkeychain
mkdir build
cd build
cmake .. -DCMAKE_INSTALL_PREFIX=/usr/local
make
sudo make install
Now let’s install non-Qt dependencies:
sudo apt-get install libxml2-dev libboost-dev libboost-program-options-dev libssl-dev libhunspell-dev
In more recent versions of Debian/Ubuntu (since Debian 9.0 Stretch and since Ubuntu 18.04 Bionic) you can also install tidy-html5 from the official repository:
sudo apt-get install libtidy-dev
If you use less recent distros, their shipped libtidy version is too old for libquentier, so you need to build the newer version by hand:
git clone https://github.com/htacg/tidy-html5.git
cd tidy-html5
git checkout 5.6.0
mkdir build-tidy
cd build-tidy
cmake .. -DCMAKE_INSTALL_PREFIX=/usr/local
make
sudo make install
All other dependencies are not shipped in official Debian/Ubuntu distros so these need be built manually.
Let’s build Google breakpad which is optional dependency on Linux and Windows. You can skip it and build Quentier without Google breakpad but then you won’t get minidump and backtrace if Quentier crashes and hence it would be much harder if not impossible to understand the reason of the crash.
git clone https://chromium.googlesource.com/breakpad/breakpad
cd breakpad
git checkout chrome_64
git clone https://chromium.googlesource.com/linux-syscall-support src/third_party/lss
./configure --prefix=/usr/local
make
sudo make install
If you intend to build libquentier and Quentier with Qt4, you’d need qt4-mimetypes. Here’s how one can build and install it:
git clone https://github.com/d1vanov/qt4-mimetypes.git
cd qt4-mimetypes
mkdir build
cd build
cmake .. -DCMAKE_INSTALL_PREFIX=/usr/local
make
sudo make install
Finally, the last required dependency is QEverCloud:
git clone https://github.com/d1vanov/QEverCloud.git
cd QEverCloud
mkdir build
cd build
At this point the build of QEverCloud has several possibilities to continue:
- If you build it with Qt5 from the official Debian/Ubuntu repositores, you need to pass one additional option to CMake telling it to link with
QtWebKit rather than QtWebEngine:
cmake .. -DUSE_QT5=1 -DUSE_QT5_WEBKIT=1 -DCMAKE_INSTALL_PREFIX=/usr/local
- If you build it with unofficial Qt5 having
QtWebEngine, you still need to pass in the option telling CMake to search for Qt5 in favour of Qt4:
cmake .. -DUSE_QT5=1 -DCMAKE_INSTALL_PREFIX=/usr/local
- Otherwise you can just give the “default” CMake command:
cmake .. -DCMAKE_INSTALL_PREFIX=/usr/local
The rest of the build/installation of QEverCloud is as follows:
make
sudo make install
That’s it! Now you are ready to actually build libquentier and/or Quentier. Please proceed to the actual build instructions for each of them.
Mac
The instruction for dependencies installation on Mac is quite similar to the one for Linux, only the package manager used in this tutorial would be brew instead of apt-get. If you use Macports instead of Homebrew, that’s fine, you just need to use port instead of brew + some packages might have different names in Macports or some packages might be missing there so you’d need to build the corresponding dependencies from source.
If you don’t have Homebrew installed and set up yet, go to its site and install and configure it. After that proceed to the following:
brew tap owncloud owncloud/owncloud
brew install git cmake qt5 boost openssl hunspell tidy-html5 qtkeychain doxygen
The owncloud tap is required for its qtkeychain formula.
Now the only thing which requires manual building from source is QEverCloud. It can be built and installed as follows:
git clone https://github.com/d1vanov/QEverCloud.git
cd QEverCloud
mkdir build
cd build
cmake .. -DUSE_QT5=1 -DCMAKE_INSTALL_PREFIX=/usr/local
make
make install
That’s it! Now you are ready to actually build libquentier and/or Quentier. Please proceed for the actual build instructions for each of them.
Windows
Building libquentier and Quentier on Windows is by far the most complex procedure among all the three supported platforms. Building all the prerequisites by hand is hard, especially given that the build procedures are very different between MSVC and MinGW toolchains. The good news is that there are prebuilt binaries for two MSVC versions - Visual Studio 2015 32 bit and Visual Studio 2017 64 bit - and for 32 bit MinGW 5.3.0. In that repository one can find appveyor.yml configuration file describing the build steps for three build configurations - two MSVC ones and one MinGW one.
If you choose to use the prebuilt binaries, the procedure is rather simple: download the binaries for the chosen build configuration and extract them all into the same folder. That folder would then contain include, lib, bin and a bunch of other folders. For building libquentier and Quentier you’d need to tell CMake the location of these folders i.e. set CMAKE_PREFIX_PATH to the location of this folder. You would also need to set PATH environment variable to the location of bin folder, INCLUDE environment variable to the location of include folder and LIB environment variable to the location of lib folder.
If you choose to build Quentier dependencies yourself on Windows, good luck! Recall that you can find the exact building steps in this appveyor.yml build configuration.
Before getting to the exact building steps, install the necessary software on your Windows machine:
Also, if you intend to build things with Visual Studio, you’d need the following additional tools:
And if you intend to build things with MinGW, you’d need
- msys64 in addition to msys coming with MinGW
- cygwin; it doesn’t matter much whether 64 or 32 bits version is used, this tutorial would assume the use of 32 bit version with Cygwin installed to
C:\cygwin; the 64 bit Cygwin would by default be installed to C:\cygwin64.
One more thing: if you would like the installation step of Quentier to produce the installer, you’d need another thirdparty package: NSIS.
Ensure the location of git, CMake, curl and 7z executables (and NSIS’ makensis if you installed it) are in your PATH environment variable i.e. you can execute git, CMake, curl and 7z commands from the terminal. The installers of git, CMake and 7zip should set PATH automatically but just in case they don’t, you can always do this by hand. In any event you’d need to add the location of curl executable to your PATH environment variable or alternatively to put curl.exe into C:\Windows\System32 folder.
The PATH environement variable can be set from the terminal as follows (assuming that you’ve unpacked curl.exe to your Downloads folder):
set PATH=C:\Users\%username%\Downloads;%PATH%
This would modify the PATH environment variable only for the current terminal session, not permanently. In order to set the environment variable permanently you can use the convenient Rapid environment editor app.
If you installed Perl and Python, perl and python should be in PATH as well.
One more thing: for Visual Studio 2015 you might need to separately install Microsoft build tools (msbuild) from this link.
You also need to ensure msbuild is in your PATH. For Visual Studio 2015 you can add it there as follows:
set PATH=C:\Program Files (x86)\MSBuild\14.0\Bin;%PATH%
And for Visual Studio 2017 as follows:
set PATH=C:\Program Files (x86)\Microsoft Visual Studio\2017\Community\MSBuild\15.0\Bin;%PATH%
Now just pick some directory where you can download stuff and step there from the terminal. For example:
cd C:\Users\%username%
md quentier_deps
cd quentier_deps
Building dependencies with Visual Studio
Preparing the environment
While you can use Visual Studio IDE to build each Quentier’s dependency, this turotial describes the command line approach instead as it is simpler in some ways.
The very first thing you’d need to do for building with Visual Studio from the command prompt is to set up all the necessary environment variables. The exact instructions for this step vary depending on the used Visual Studio version. It is a very simple thing to google up but for the sake of example here are the instructions for Visual Studio 2015: open the command prompt (i.e. cmd.exe) and type there the following:
C:\Program Files (x86)\Microsoft Visual Studio 14.0\VC\vcvarsall.bat
This would set several environment variables required to run Visual Studio’s compiler, linker and other build tools. This command would set up the environment for x86 i.e. 32 bit builds. If you want to build for 64 bit platform, you need to add one extra argument to the above command:
C:\Program Files (x86)\Microsoft Visual Studio 14.0\VC\vcvarsall.bat amd64
For the sake of another example and to illustrate why the exact instructions vary depending on the used Visual Studio version, here’s the command which needs to be run when using Visual Studio 2017 for 64 bit builds:
C:\Program Files (x86)\Microsoft Visual Studio\2017\Community\VC\Auxiliary\Build\vcvars64.bat
Now you are ready to start downloading and building the dependencies!
Building boost program options library
Let’s get started from Boost C++ libraries. For libquentier and Quentier only the header-only parts + program options library are required. You can just download prebuilt boost binaries corresponding to your Visual Studio version from here but if for some reason you want to build the program options library yourself, proceed as follows:
curl -fsSL https://dl.bintray.com/boostorg/release/1.65.0/source/boost_1_65_0.7z -o boost_1_65_0.7z
7z x boost_1_65_0.7z
bootstrap.bat
.\b2 --build-dir=%cd%\build --with-program_options --toolset=msvc-14.0 link=shared address-model=32 runtime-link=shared variant=release,debug --build-type=complete stage
The toolset option specifies which version of Visual Studio would be used; msvc-14.0 corresponds to Visual Studio 2015. Other options include:
msvc-14.1 for Visual Studio 2017msvc-12.0 for Visual Studio 2013msvc-11.0 for Visual Studio 2012msvc-10.0 for Visual Studio 2010
I omit the rest of the list as older Visual Studio versions most likely won’t be able to build libquentier and Quentier so you shouldn’t use them anyway.
Notice the address-model parameter; it should be either of two values: 32 for 32 bit build or 64 for 64 bit build.
You can find more information about boost’s build system here.
After the build finishes, you’d have built program options library within lib directory. For each version of the library (debug and release) there would be two files: .lib and .dll ones. When building Quentier, you might need to specify BOOST_LIBRARYDIR parameter pointing to the lib directory for CMake to find the library.
Another important note: boost 1.65.0 is used in this example for a reason: at the time of this writing more recent version of Boost exists: 1.66.0. Unfortunately, in this version the naming of boost library files has changed but CMake was not ready for that change. As a result, at the time of this writing the latest released CMake (3.10.1) can’t find boost libraries for version 1.66.0.
Building OpenSSL
OpenSSL library is used by libquentier for its encryption algorithms and by Qt for secure networking. OpenSSL’s building procedure on Windows is quite complex and seems to heavily depend on the version of OpenSSL used for building. You might want to skip the building of OpenSSL and instead just download the prebuilt version, for example, from here. However, note the downloaded OpenSSL might depend on another version of Visual C++ runtime than the version you intend to use for libquentier and/or Quentier. It might be a non-issue if you are building libquentier and Quentier for the purposes of develoment/testing/tinkering. But it would be an issue if you’re building Quentier for creating the installer and further distribution of it: the installer currently only attempts to download the version of Visual C++ runtime corresponding to the Visual Studio used to build Quentier but not other versions of the runtime.
Important note about OpenSSL version to use: there are currently two major different versions out there: 1.0 and 1.1. Qt has only become able to work with OpenSSL 1.1 in 5.10 release, so it’s better to use OpenSSL 1.0 version for now:
git clone https://github.com/openssl/openssl.git
cd openssl
git checkout OpenSSL_1_0_2r
OpenSSL_1_0_2r is the name of the tag which is the latest in OpenSSL 1.0 series at the time of this writing. Look at the official OpenSSL repository’s releases to find out whether there is more recent 1.0 version available. If it’s available, use the latest version as it might include vital security fixes.
Now let’s get to the actual building procedure. It is somewhat different for 32 bit and 64 bit builds so the steps for the two variants would be displayed separately. First, the version for 32 bit build:
perl Configure VC-WIN32 no-asm --prefix=%cd%\installdir
ms\do_ms
nmake -f ms\ntdll.mak
nmake -f ms\ntdll.mak test
nmake -f ms\ntdll.mak install
That was the release build of OpenSSL. All the built stuff would be installed into the installdir folder within the folder with OpenSSL sources. If you intend to build libquentier and Quentier in “Debug” or “Release with debug info” configurations (which is likely if you intend to hack on libquentier and/or Quentier) you’d also need to build the debug OpenSSL version - for OpenSSL it is important whether the build is debug or release one due to some quite special handling of exported symbols in different versions. In short, trying to link the debug application with release version of OpenSSL might fail, hence it’s better to have debug version as well as release one. Here’s how the debug version can be built for 32 bit build:
perl Configure debug-VC-WIN32 no-asm --prefix=%cd%\installdir-dbg
ms\do_ms
nmake -f ms\ntdll
nmake -f ms\ntdll.mak test
nmake -f ms\ntdll.mak install
Quite similar to the release build, the only difference is the configuration: debug-VC-WIN32 instead of just VC-WIN32 + another installation dir to prevent intermixing the two versions together.
Now it’s better to put the debug libraries near the release ones only you’d need to adjust their names to make it easier for CMake to find both debug and release versions:
copy installdir-dbg\lib\libeay32.lib installdir\lib\libeay32d.lib
copy installdir-dbg\lib\ssleay32.lib installdir\lib\ssleay32d.lib
The 64 bit build instructions are a little different:
perl Configure VC-WIN64A no-asm --prefix=%cd%\installdir
ms\do_win64a
nmake -f ms\ntdll.mak
cd out32dll
..\ms\test
cd ..
nmake -f ms\ntdll.mak install
and for debug build:
perl Configure debug-VC-WIN64A no-asm --prefix=%cd%\installdir-dbg
ms\do_win64a
nmake -f ms\ntdll.mak
cd out32dll
..\ms\test
cd ..
nmake -f ms\ntdll.mak install
The same advice for holding debug libraries near the release ones holds for 64 bit as well.
Building libiconv
Building libiconv 1.15 with Visual Studio is relatively easy thanks to the efforts of GitHub user kiyolee who created several repositories for popular originally Unix libraries with build system set up for straightforward building with Visual Studio on Windows. The procedure is as follows:
git clone https://github.com/kiyolee/libiconv-win-build.git
cd libiconv-win-build
Now need to step into the directory containing the set up build files for the version of Visual Studio you use. There are several options to choose from:
- build-VS2008
- build-VS2010
- build-VS2013-MT
- build-VS2013
- build-VS2015-MT
- build-VS2015
- build-VS2017-MT
- build-VS2017
The -MT switch means static linkage to multithreaded Visual C++ runtime. If you plan to distribute the built libquentier and Quentier, be aware that static linking with proprietary runtime library is generally not compatible with LGPL and GPL licenses so it’s better to choose some non -MT option.
As this example tutorial uses Visual Studio 2015, picking the corresponding folder:
cd build-VS2015
msbuild libiconv.sln /p:Configuration="Release" /p:Platform="Win32"
The “Platform” option specifies whether you build 32 bit or 64 bit version of the library; Win32 means 32 bit version, x64 means 64 bit one.
After the build the library files would be located within “Release” folder for 32 bit build and within “x64\Release” folder for 64 bit build:
- libiconv.lib
- libiconv.dll
The recommended approach is to copy or move these files somewhere where it’d be easy for CMake to find them. For example, within the cloned libiconv-win-build folder you could create some installdir with bin and lib folders inside it. Then move libiconv.dll to bin folder and move libiconv.lib to lib folder. Than you could either specify the path to installdir within CMAKE_PREFIX_PATH or, if you don’t plan to build libquentier and/or Quentier with different compilers, you could assign the environment variables making it unnecessary to specify anything during CMake step:
set INCLUDE=%cd%\..\include;%INCLUDE%
set LIB=%cd%\installdir\lib;%LIB%
set PATH=%cd%\installdir\bin;%PATH%
Building zlib
Building zlib 1.2.11 with Visual Studio is straightforward thanks again to the efforts of GitHub user kiyolee:
git clone https://github.com/kiyolee/zlib-win-build.git
cd zlib-win-build
cd build-VS2015
msbuild zlib.sln /p:Configuration="Release" /p:Platform="Win32"
As with libiconv, the resulting binaries would be in “Release” folder for 32 bit build and in “x64\Release” folder for 64 bit build. The recommended approach is to put the built .lib and .dll files into relevant folders, as with libiconv (see above). The environment variables making it simple for CMake to locate the libraries are as follows:
set INCLUDE=%cd%\..;%INCLUDE%
set LIB=%cd%\installdir\lib;%LIB%
set PATH=%cd%\installdir\bin;%PATH%
Building libxml2
And once again huge thanks goes to GitHub user kiyolee for making it really simple to build libxml2 on Windows:
git clone https://github.com/kiyolee/libxml2-win-build.git
cd libxml2-win-build
cd build-VS2015
msbuild libxml2.sln /p:Configuration="Release" /p:Platform="Win32"
As with libiconv and zlib, the resulting binaries would be in “Release” folder for 32 bit build and in “x64\Release” folder for 64 bit build. The recommended approach is to put the built .lib and .dll files into relevant folders, as with libiconv (see above). The environment variables making it simple for CMake to locate the libraries are as follows:
set INCLUDE=%cd%\..\include;%INCLUDE%
set LIB=%cd%\installdir\lib;%LIB%
set PATH=%cd%\installdir\bin;%PATH%
Building libhunspell
git clone https://github.com/hunspell/hunspell.git
cd hunspell
git checkout v1.7.0
msbuild %cd%\msvc\Hunspell.sln /p:Configuration="Release_dll" /p:Platform="Win32"
The 64 bit “Platform” would be “x64”, as expected. The location of built binaries is slightly different:
- msvc\Release_dll\libhunspell\libhunspell.lib
- msvc\Release_dll\libhunspell\libhunspell.dll
It is for 32 bit build, for 64 bit build these would be found in
- msvc\x64\Release_dll\libhunspell.lib
- msvc\x64\Release_dll\libhunspell.dll
As with libiconv, zlib and libxml2, it is recommended to put the built files into relevant folders and set INCLUDE, LIB and PATH environment variables.
Building tidy-html5
Building tidy-html5 is straightforward thanks to the project’s use of CMake build system:
git clone https://github.com/htacg/tidy-html5.git
cd tidy-html5
git checkout 5.6.0
md build-tidy
cd build-tidy
cmake .. -G "NMake Makefiles" -DCMAKE_BUILD_TYPE=Release -DBUILD_SHARED_LIB=ON -DCMAKE_INSTALL_PREFIX="%cd%\installdir"
cmake --build . --target all
cmake --build . --target install
And that’s all. The resulting binaries as well as development headers would be located in build-tidy/installdir folder. You’d need to add it to CMAKE_PREFIX_PATH when building libquentier and/or Quentier. Or alternatively you can add installdir/bin to PATH, installdir/lib to LIB and installdir/include to INCLUDE environment variables.
Building qtkeychain
QtKeychain library has some peculiarities on Windows so here are the detailed build instructions:
git clone https://github.com/frankosterfeld/qtkeychain.git
cd qtkeychain
git checkout v0.9.1
By default QtKeychain on Windows 7 and higher uses Credential Store. However, I encountered some problems getting it to work with libquentier and hence decided to use another option: keeping the data within QSettings but encrypted using WinAPI function CryptProtectData with the user’s logon credentials. In addition, in this mode the built Quentier app might even work on Windows older than 7 i.e. XP.
Here are the steps required to build QtKeychain:
md build
cd build
cmake .. -G "NMake Makefiles" -DCMAKE_BUILD_TYPE=Release -DUSE_CREDENTIAL_STORE=OFF -DCMAKE_INSTALL_PREFIX="%cd%\installdir"
If CMake complains about not finding Qt, add `-DCMAKE_PREFIX_PATH=”” to the above command.
cmake --build . --target all
cmake --build . --target install
That’s it, after this step the necessary binaries as well as development headers would be within build/installdir folder. The recipe for using them for building libquentier and/or Quentier with either CMAKE_PREFIX_PATH or PATH/LIB/INCLUDE is the same as above.
Building Google breakpad
Building Google breakpad on Windows is a very painful experience because the process is not really well documented and, furthermore, building the project on Windows is maintained surprisingly poorly by Google. But don’t lose hope, it is still possible to build this thing and here are the instructions:
git clone https://chromium.googlesource.com/breakpad/breakpad
cd breakpad
git checkout chrome_64
cd src
git clone https://github.com/google/googletest.git testing
cd ..\..
git clone https://chromium.googlesource.com/external/gyp
cd gyp
python setup.py install
cd ..\breakpad
md installdir
md installdir\include\breakpad\client\windows
md installdir\include\breakpad\common\windows
md installdir\lib
md installdir\bin
xcopy src installdir\include\breakpad /e
The last line from the above copies almost entire sources of breakpad into the installation prefix’s include folder. That might be overkill but hand picking the headers which really need to be present there is too much trouble so this simple hack works.
At this point you need to patch the gyp project file to make breakpad buildable on Windows. You can either do it by hand using any text editor or using sed from msys64: within “breakpad/src/build” folder there’s a file called common.gypi. Inside this file you need to replace all occurrences of 'WarnAsError': 'true' with 'WarnAsError': 'false'. This setting controls whether the compiler would treat warnings as build errors or not. Some warnings do exist when building on Windows so in the default configuration the build can’t succeed. Here’s how this setting can be changed with the help of sed editor:
C:\msys64\usr\bin\bash -lc "cd /c/dev/breakpad/src/build && sed -i -e \"s/'WarnAsError': 'true'/'WarnAsError': 'false'/g\" common.gypi"
Replace the path to breakpad dir with your actual one in the above command.
Now can proceed building the breakpad. Will start from the client libraries and will do two builds, in release and debug configurations:
..\gyp\gyp.bat src\client\windows\breakpad_client.gyp --no-circular-check -Dwin_release_RuntimeLibrary=2 -Dwin_debug_RuntimeLibrary=3
cd src\client\windows
msbuild breakpad_client.sln /p:Configuration="Release" /p:Platform="Win32"
msbuild breakpad_client.sln /p:Configuration="Debug" /p:Platform="Win32"
For 64 bit build set the “Platform” parameter to “x64”. The built release binaries can be found within Release/lib folder and debug ones within Debug/lib one. Copy them to the installation dir while adding the \_d suffix for debug libraries:
copy Release\lib\common.lib ..\..\..\installdir\lib
copy Release\lib\crash_generation_client.lib ..\..\..\installdir\lib
copy Release\lib\crash_generation_server.lib ..\..\..\installdir\lib
copy Release\lib\exception_handler.lib ..\..\..\installdir\lib
copy Debug\lib\common.lib ..\..\..\installdir\lib\common_d.lib
copy Debug\lib\crash_generation_client.lib ..\..\..\installdir\lib\crash_generation_client_d.lib
copy Debug\lib\crash_generation_server.lib ..\..\..\installdir\lib\crash_generation_server_d.lib
copy Debug\lib\exception_handler.lib ..\..\..\installdir\lib\exception_handler_d.lib
Now need to build dump_syms utility which would then be used during the build of Quentier for the extraction of symbols from Quentier executable and libquentier library - these symbols would then be used to produce stack traces during crash handling. The end users would then be able to provide the stack traces while reporting crashes - these can be used as minimal hints to the reason of the crash. Without crash handling every single crash is like a shot in the dark - you can’t say who did it or why.
cd ..\..\..
..\gyp\gyp.bat src\tools\windows\tools_windows.gyp --no-circular-check -Dwin_release_RuntimeLibrary=2 -Dwin_debug_RuntimeLibrary=3
cd src\tools\windows
msbuild tools_windows.sln /p:Configuration="Release" /p:Platform="Win32"
After it’s built copy it to the installation prefix’s bin directory:
copy Release\dump_syms.exe ..\..\..\installdir\bin
The final touch: need one other executable, minidump_stackwalk. It is the executable which parses the minidump produced by the crashing app using the symbols created by dump_syms. It seems Google has never planned for this executable to be used - or even built - on Windows because currently the only way to build this tool on Windows is using Cygwin (thus depending on its dlls). Thankfully, guys from Mozilla have already done that so this tool can just be downloaded from Mozilla servers:
curl -fsSL http://hg.mozilla.org/build/tools/raw-file/755e58ebc9d4/breakpad/win32/minidump_stackwalk.exe -o minidump_stackwalk.exe
curl -fsSL http://hg.mozilla.org/build/tools/raw-file/755e58ebc9d4/breakpad/win32/cygwin1.dll -o cygwin1.dll
curl -fsSL http://hg.mozilla.org/build/tools/raw-file/755e58ebc9d4/breakpad/win32/cygstdc++-6.dll -o cygstdc++-6.dll
curl -fsSL http://hg.mozilla.org/build/tools/raw-file/755e58ebc9d4/breakpad/win32/cyggcc_s-1.dll -o cyggcc_s-1.dll
If you feel inclined, in this thread some guy describes what to change in breakpad sources to make minidump_stackwalk utility buildable on Windows with Visual C++. You can follow this description to try and build minidump_stackwalk on Windows with Visual C++.
That was the last dependency so the guide for building Quentier and/or libquentier dependencies on Windows using Visual Studio is finished now!
Building dependencies with MinGW
Building the dependencies of Quentier and/or libquentier with MinGW on Windows is a suffiicently different experience from building with Visual C++. At some points it’s simpler but at other points it’s harder.
This tutorial would assume you build stuff with the official MinGW version, not mingw-w64; the latter might work too but it was not tested i.e. currently MinGW build of libquentier and Quentier has only been tested in 32 bit mode.
Ensure MinGW’s compilers and tools are in your PATH environment variable, by doing this:
set PATH=C:\MinGW\bin;%PATH%
Building boost program options library
Let’s get started from Boost C++ libraries. For libquentier and Quentier only the header-only parts + program options library is required. It doesn’t seem like prebuilt MinGW versions of boost are available somewhere on the Internet so need to build them from source:
curl -fsSL https://dl.bintray.com/boostorg/release/1.65.0/source/boost_1_65_0.7z -o boost_1_65_0.7z
7z x boost_1_65_0.7z
bootstrap.bat gcc
.\b2 --build-dir=%cd%\build --with-program_options --toolset=gcc link=shared address-model=32 runtime-link=shared variant=release,debug --build-type=complete stage
You can find more information about boost’s build system here.
After the build finishes, you’d have built program options library within lib directory. For each version of the library there would be two files: .lib and .dll ones. When building Quentier, you might need to specify BOOST_LIBRARYDIR parameter pointing to the lib directory for CMake to find the library.
Building OpenSSL
OpenSSL library is used by libquentier for its encryption algorithms and by Qt itself for secure networking. OpenSSL’s building procedure on Windows is quite complex and seems to heavily depend on the version of OpenSSL used for building. You might want to skip the building of OpenSSL and instead just download the prebuilt version, for example, from here. The versions at the link were built with Visual C++ but thanks to the lack of name mangling for code written in C programming language, the OpenSSL libraries built by MinGW and Visual C++ can be used interchangeably. However, note that it is the exception rather than the rule - in general libraries/executables built by different compilers cannot be used together. Also note that the downloaded OpenSSL would depend on some version of Visual C++ runtime. It might be a non-issue if you are building libquentier and Quentier for the purposes of develoment/testing/tinkering. But it would be an issue if you’re building Quentier for creating the installer and distributing it: for MinGW builds the installer currently doesn’t offer the option to download any version of Visual C++ runtime.
Important note about OpenSSL version to use: there are currently two major different versions out there: 1.0 and 1.1. Qt has only become able to work with OpenSSL 1.1 in 5.10 release, so it’s better to use OpenSSL 1.0 version for now:
git clone https://github.com/openssl/openssl.git
cd openssl
git checkout OpenSSL_1_0_2r
OpenSSL_1_0_2r is the name of the tag which is the latest in OpenSSL 1.0 series at the time of this writing. Look at the official OpenSSL repository’s releases to find out whether there is more recent 1.0 version available. If it’s available, use the latest version as it might include vital security fixes.
Here’s how you can build OpenSSL with MinGW in a single command:
C:\MinGW\msys\1.0\bin\bash -lc "cd /c/dev/openssl && ./Configure shared mingw --prefix=/c/dev/openssl/installdir && make depend && make && make test && make install"
Replace /c/dev/openssl with the actual directory into which you cloned OpenSSL sources. The resulting binaries as well as development headers would be in installdir folder after this command.
Building libiconv
md libiconv-win-build
cd libiconv-win-build
curl -fsSL https://ftp.gnu.org/pub/gnu/libiconv/libiconv-1.15.tar.gz -o libiconv-1.15.tar.gz
7z x libiconv-1.15.tar.gz
7z x libiconv-1.15.tar
del libiconv-1.15.tar
del libiconv-1.15.tar.gz
cd libiconv-1.15
C:\cygwin\bin\bash -lc "cd /cygdrive/c/dev/libiconv-win-build/libiconv-1.15 && export PATH=/usr/local/mingw32/bin:$PATH && ./configure --host=i686-w64-mingw32 --prefix=$(pwd)/installdir CC=i686-w64-mingw32-gcc CPPFLAGS='-I/usr/local/mingw32/include -Wall' LDFLAGS='-L/usr/local/mingw32/lib' && make && make check && make install"
Replace /cygdrive/c/dev/libiconv-win-build in the above command with the actual Cygwin path to the created libiconv-win-build directory.
Building zlib
md zlib-win-build
cd zlib-win-build
curl -fsSL https://zlib.net/zlib-1.2.11.tar.gz -o zlib-1.2.11.tar.gz
7z x zlib-1.2.11.tar.gz
7z x zlib-1.2.11.tar
del zlib-1.2.11.tar
del zlib-1.2.11.tar.gz
cd zlib-1.2.11
C:\MinGW\bin\mingw32-make.exe install -f win32\Makefile.gcc INCLUDE_PATH=%cd%\installdir\include BINARY_PATH=%cd%\installdir\bin LIBRARY_PATH=%cd%\installdir\lib SHARED_MODE=1
The resulting binaries and development headers would be within installdir directory inside zlib-1.2.11 directory.
Building libxml2
git clone https://gitlab.gnome.org/GNOME/libxml2.git
cd libxml2
git checkout v2.9.7
cd win32
Now need to do one trick: change the extension of the import library from .lib to .dll.a as the latter one is more appropriate for MinGW built library:
C:\msys64\usr\bin\bash -lc "cd /c/dev/libxml2/win32 && sed -i -e s/\$\(XML_BASENAME\)\.lib/\$\(XML_BASENAME\).dll.a/g Makefile.mingw"
Replace /c/dev/libxml2 in the above command with your actual libxml2 folder.
One other trick is required to ensure the development headers of libiconv and the library are seen during the build of libxml2 and nothing gets in between:
set INCLUDEBAK=%INCLUDE%
set INCLUDE=-Ic:/dev/libiconv-win-build/libiconv-1.15/installdir/include
set LIBBAK=%LIB%
set LIB=-Lc:/dev/libiconv-win-build/libiconv-1.15/installdir/lib
Replace c:/dev/libiconv-win-build in the above commands with your actual path to libiconv-win-build.
Now can continue with building libxml2:
cscript configure.js compiler=mingw prefix=%cd%\installdir debug=no http=no ftp=no
C:\MinGW\bin\mingw32-make.exe install -f Makefile.mingw
After the build is done, you can return back the contents of INCLUDE and LIB environment variables:
set INCLUDE=%INCLUDEBAK%
set LIB=%LIBBAK%
One other detail: the build just done has created
- shared library - libxml2.dll
- import library - libxml2.dll.a
- static library - libxml2.a
CMake seems to prefer static library over the shared one if both are available. If you intend to build libquentier and Quentier for the purposes of development/testing/tinkering, it doesn’t matter much which version would be used. However, for distribution purposes it’s better to stick with the shared library. The simple way to enforce its use is to delete the just built static library:
del installdir\lib\libxml2.a
Building libhunspell
git clone https://github.com/hunspell/hunspell.git
cd hunspell
git checkout v1.6.2
A small patch is required to get libhunspell building with MinGW. Apply it along with building and installing the library:
C:\msys64\usr\bin\bash -lc "cd /c/dev/hunspell && autoreconf -i && sed -i -e s/\ \|\ S_IRWXG\ \|\ S_IRWXO//g src/tools/hzip.cxx && CC=C:/MinGW/bin/gcc CXX=C:/MinGW/bin/g++ ./configure --prefix=$(pwd)/installdir --host=i386-unknown-mingw32 && make && make check && make install"
Replace /c/dev/hunspell in the above command with your actual path to hunspell directory. The resulting binaries as well as development headers would be within installdir folder within hunspell folder.
You can read more about why the patch is required here and here.
Building tidy-html5
Building tidy-html5 with MinGW is very similar to building it with MSVC thanks to the project’s use of CMake build system:
git clone https://github.com/htacg/tidy-html5.git
cd tidy-html5
git checkout 5.6.0
md build-tidy
cd build-tidy
Need to deal with one odd thing before continuing: CMake sometimes stops and complains during the generation of MinGW makefiles about the presence of sh.exe within PATH environment variable; the sh.exe CMake doesn’t like is typically the one from the Git installation. To work around this problem, can temporarily remove git folder from PATH:
set PATH=%PATH:C:\Program Files\Git\usr\bin;=%
Now can proceed:
cmake .. -G "MinGW Makefiles" -DCMAKE_BUILD_TYPE=Release -DBUILD_SHARED_LIB=ON -DCMAKE_INSTALL_PREFIX="%cd%\installdir"
cmake --build . --target all
cmake --build . --target install
The resulting binaries as well as development headers would be located in build-tidy/installdir folder.
Don’t forget to return git back to PATH:
set PATH=%PATH%;C:\Program Files\Git\usr\bin
Building qtkeychain
git clone https://github.com/frankosterfeld/qtkeychain.git
cd qtkeychain
git checkout v0.9.1
One patch is required for building with MinGW:
C:\msys64\usr\bin\bash -lc "cd /c/dev/qtkeychain && sed -i s/SecureZeroMemory/ZeroMemory/g keychain_win.cpp"
Note that this patch might have consequences for qtkeychain’s security: some C++ compilers might optimize away the call to ZeroMemory but not the call to SecureZeroMemory. You might want to apply a more proper patch emulating SecureZeroMemory missing in MinGW, see this to get started.
As with tidy-html5, need to work around CMake’s problem with sh.exe within PATH:
set PATH=%PATH:C:\Program Files\Git\usr\bin;=%
Now can proceed to building qtkeychain for MinGW:
md build
cd build
cmake .. -G "MinGW Makefiles" -DCMAKE_BUILD_TYPE=Release -DUSE_CREDENTIAL_STORE=OFF -DCMAKE_INSTALL_PREFIX="%cd%\installdir"
If CMake complains about not finding Qt, add `-DCMAKE_PREFIX_PATH=”” to the above command.
cmake --build . --target all
cmake --build . --target install
Now returning git back to PATH:
set PATH=%PATH%;C:\Program Files\Git\usr\bin
That was currently the last dependency for MinGW as Google breakpad is not integrated into MinGW version of Quentier at the moment.
Dec 16, 2017
In this post I describe in more details what Quentier app is capable of by the current moment.
First of all, please note that at the time of this writing Quentier is in public alpha stage. That means the project is very fresh, some things are unpolished while some other things might just refuse to work due to some unforeseen circumstances. It is pretty normal to go through this stage for any new software project, just be aware of that and don’t expect too much from the current version. Also please report the discovered issues to the project’s issue tracker.
Accounts
Quentier as a note taking app can work in two modes: it can either work with local accounts or with Evernote accounts. That means you are not obliged to have Evernote account if all you want to do is managing notes with Quentier on just a single computer. Or maybe even on several computers provided that you either copy the data between computers manually or you keep the local account data on a USB stick which you mount to different computers. The latter option requires that you start Quentier with --storageDir <path> command line parameter pointing at the location of your account data. By default, if no such command line option is specified, Quentier keeps its persistent data at the following locations depending on the platform the app runs on:
~/.quentier on Linux~/Library/Application Support/quentier.org/Quentier on OS X / macOSC:\Users\%USERNAME%\AppData\Roaming\Quentier on Windows
At the moment Quentier works best when only a single instance of the application is running at any moment of time. There are some protection measures against having two app instances working with the same account, however, right now if you try hard enough you might be able to fool them. It is possible to run several instances of the application working with different accounts, however, it might not work on Windows and it might screw up the usefulness of logging on other platforms since currently all instances of Quentier attempt to write logs into the same log file.
The preferred way to work with different accounts is to have a single instance of the application running and to switch between accounts as necessary: that can be done by opening “File” menu and choosing one of “Switch account” submenu’s options. Note that most of different settings and preferences within Quentier are persistent and account-specific. Even the relative sizes of main window’s parts are persisted and restored on per account basis.
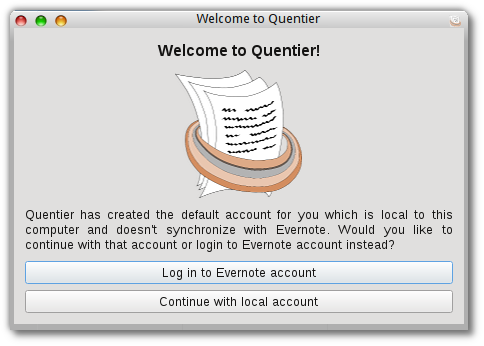
When you open Quentier app for the first time, it would ask you what would you like to do: use the app for local note-taking or use it as Evernote client. The local account is created for you automatically and even if you choose to use Quentier as Evernote client, you can still switch back to the local account later. You can also create as many local and Evernote accounts as you wish and switch between them freely.
To add a new account, open “File” menu -> “Switch account” -> “Add account”. You will be prompted which kind of account you want to create - either local one or Evernote one.
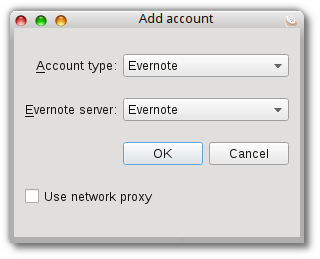
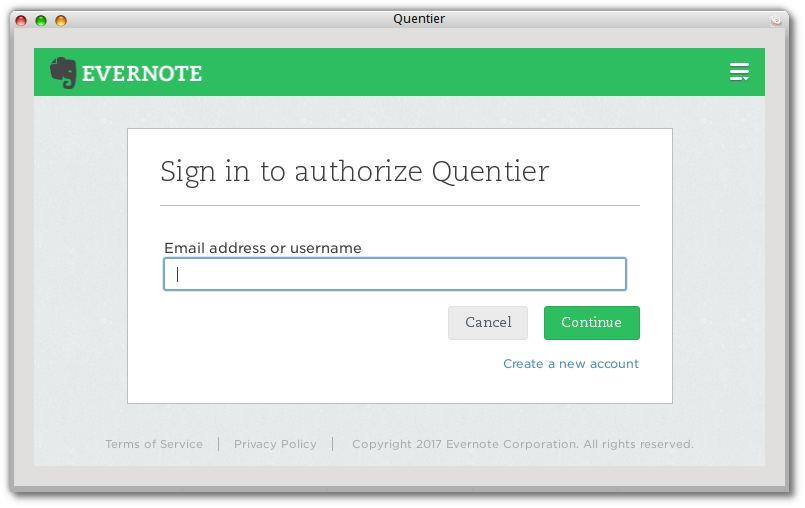
If you choose Evernote account you will be prompted the Evernote server to use: “Evernote” means the default server used by most casual users, “Yinxiang Biji” is Chinese Evernote server and “Evernote sandbox” is mostly useful to developers - it is Evernote’s server with which the synchronization algorithms can be tested. After you choose the Evernote server to use you’ll be prompted to allow Quentier manage your Evernote account’s data.
It is also possible to manage the existing accounts: “File” -> “Switch account” -> “Manage accounts”. From the dialog you can add new accounts, revoke the authentication for particular Evernote accounts (might be useful in case of synchronization problems: revoking the authentication triggers authentication request on the next synchronization attempt) and even delete the account. Only use the latter option with great care because the removal of local accounts is permanent and cannot be reverted. The removal of Evernote account simply means unlinking Quentier from managing that account, not the permanent removal of your Evernote account, of course.
One other nice account-related feature is the ability to change the display name of any account - this current account’s display name is shown at the top of the main window. For example, for Evernote accounts your username would be displayed. You might want to change that to show your real name. Within “Manage accounts” dialog you can do so by entering your real name into the “Display name” column.
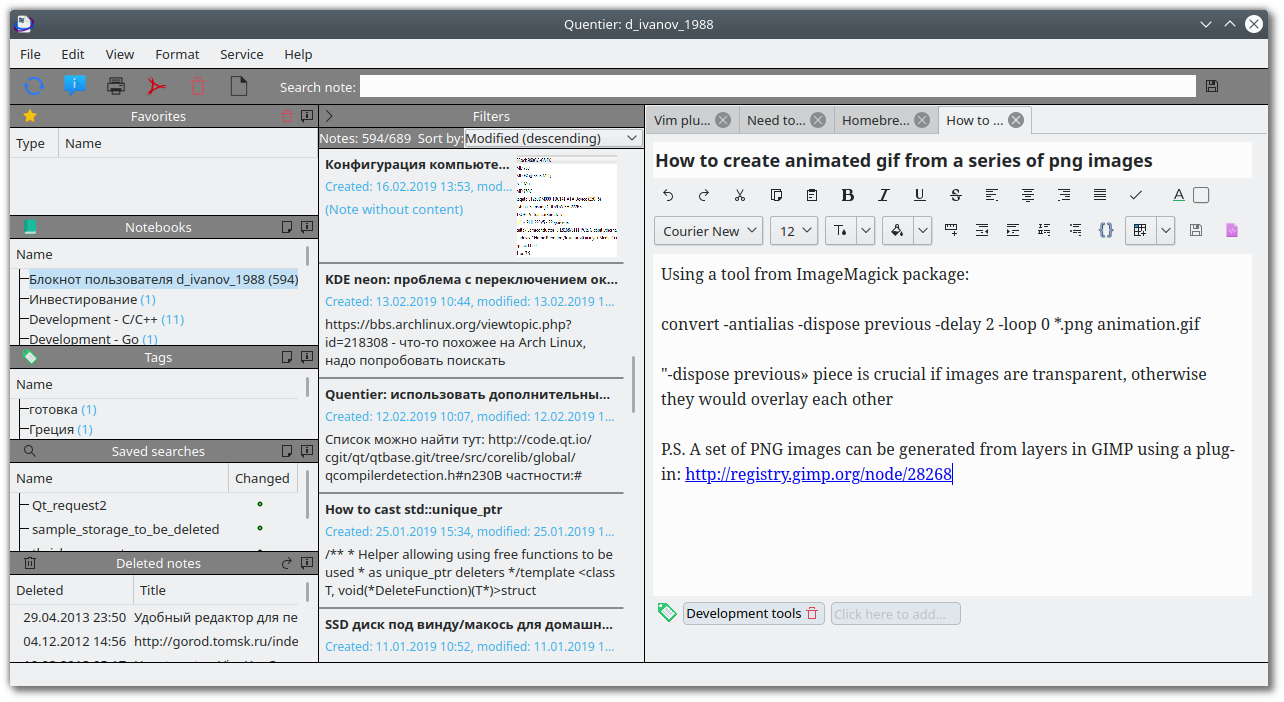
User interface
On the upper part of the main window there’s a toolbox with several buttons for most frequently used actions: synchronization (for Evernote accounts), printing of current note or exporting it to PDF, deletion of current note or creation of a new one.

This panel also contains the note search string which can be used to filter notes by some particular criteria. The search string fully supports the Evernote search syntax. The search string can be saved (as a “saved search” data item within the account) by pressing the button to the right from the search string.

On the left side of Quentier’s main window there are panels displaying notebooks, tags, saved searches, favorited items and deleted notes. By default the deleted notes are not displayed but the display of them - as well as the display of all other side panels - can be toggled using the appropriate option from “View” menu. The entire left side panel can be hidden for which there’s a default keyboard shortcut - F10.

Favorited items are similar to Evernote shortcuts: they allow you to create links to most frequently used content - particular notes, notebooks, tags, saved searches - for quick access to them. However, favorited items are favorited only locally for either local or Evernote account because Evernote service doesn’t offer any API for the synchronization of favorited items or shortcuts. Or no such public API at least. Quentier is not the only Evernote client which has to cope with this restriction, Alternote app describes the issue within its FAQ.
The list of notebooks is really a tree view as notebooks can be nested into stacks and linked notebooks are displayed as children of special items representing users owning the corresponding linked notebooks. Notebooks can be freely moved between stacks either via context-menu or via drag-n-drop. However, it is prohibited to, say, drop user’s own notebook onto the stack corresponding to some linked notebook. Or to attempt doing the same thing across different linked notebooks.
Tags also form a tree structure as they can be nested into each other. Plus, tags downloaded from linked notebooks are also shown under special items representing users owning the corresponding linked notebooks. Tags nesting can be altered either via context menu or via drag-n-drop, with the same restrictions as for notebooks.
Saved searches list is a simple list without any kind of nesting. The query corresponding to each saved search can be edited through that saved search’s context menu.
The list of deleted notes shows the notes which are still persisted within the local storage (and Evernote account) but are marked as deleted. Quentier doesn’t allow the permanent removal of notes for Evernote accounts as Evernote service prohibits this possibility for third party apps. As well as the possibility to permanently remove a tag, a notebook or a saved search. It is quite a wise decision from Evernote as this way Quentier or any other third party app has no way to cause the data loss within your Evernote account - you can only potentially lose the data which has not been synced yet. Or, if you are very inattentive, you can mark the note as deleted from third party app and then wipe it from the trash can via the official Evernote client or via Evernote web client. So, pay attention when emptying the trash of Evernote notes - make sure there’s nothing of worth there.
The next column from the left edge of the main window is the list of notes. Each item within the list shows some information about the note: its title, creation and modification time, preview text and the thumbnail. The thumbnails are only displayed for Evernote accounts if “Show note thumbnails” preference is enabled (it is by default) and if the synchronization setting “Download note thumbnails” is enabled (it is by default). At this time there is no note table view so note list view is the only way to observe the existing notes.
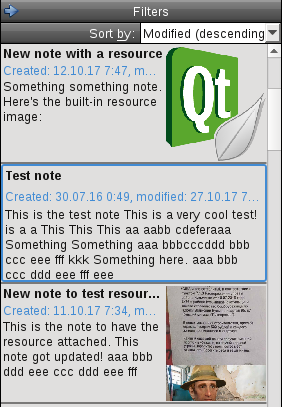
In the upper part of the note list view there’s a widget called “Filters”, by default folded. To unfold it, press the button with left pointing arrow. The unfolded widget allows to enable filters for notes list: notebooks, tags or a saved search. The saved search filter overrides notebook and tag filters: the latter ones become disabled (greyed out) to indicate they don’t contribute to the actual filtering criteria - saved search - at the moment. Filters by notebooks, tags and saved search are all disabled when the note search string (on the upper panel, above the note editor) is not empty. I.e. filter by saved search overrides filters by notebooks and tags but note search string overrides just any filter.
Filtering notes by a single notebook works automatically by selecting the notebook within the list i.e. as you select different notebooks within the notebooks list, you’d see notes from the selected notebook but not from other notebooks. That’s how the official Evernote clients work so it should be fairly convenient for Evernote users.
Currently there’s a limitation on filtering by notebooks and tags: you can’t filter the notes by linked notebooks and tags from linked notebooks. The reasons for this are purely technical and have to do with the potential clashing of notebook and/or tag names from user’s own account and from linked notebooks. This issue would hopefully be addressed in future.
Slightly below the filters widget there’s a combo box allowing to pick the desired sorting criteria for the list of notes. By default the notes are sorted by modification time, the recently modified notes go first.
Note editor
On the right side of the main window there’s one or more tabbed note editors displaying the contents of notes. Quentier by default limits the amount of open note editors in order to prevent the use of ever growing amounts of memory. It happens automatically: if you open different notes one by one, the editors for previous notes (longest time untouched ones) automatically close. The unsaved edits made to notes within those editors are automatically saved, of course, so there is no risk of data loss. The only thing which is lost when the note editor is closed is the state of the undo stack i.e. the ability to do undo/redo for already closed note editors is gone.
Each note editor can be moved from tab to a separate window. For this right click on the note editor tab’s header and choose “Open in separate window” option. However, beware that once you did this, the only way to return the note editor to the tabs list is to close it and open the same note again.
The attachments to notes (“resources” in Evernote terminology) are represented as either images (for image attachments) or small blocks containing the name and the size of the attachment and the buttons to save the attachment to some file or open the attachment for editing. If the attachment was opened for editing within some app, Quentier would watch for changes done by the app and once the attachment file changes, it would update the resource within the note. Unfortunately at the time of this writing it is not possible to choose the application which is to be used for editing of the attachment - it appears to be highly platform specific and no standard Qt API to implement that exists.
The image attachments can be rotated clockwise or counterclockwise and can be resized - for that put the cursor to the right bottom edge of the image and drag it.
The columns of tables within notes can be resized - simply put the cursor on the border between the columns and drag it.
The note editor supports a wide range of undo/redo capabilities - it tries hard to intercept every possible action and account for it within the undo/redo stack. The intercepted actions include text input as well as various other manual actions like rotating the image attachments - try to rotate the image attachment and then click “Undo”. Then click “Redo”. Now you see how it works.
The note editor’s undo stack implementation is one of the trickiest parts of the entire project. That means, it is unfortunately considerably fragile. If it doesn’t work in some cases, please forgive it - it tries as hard as I was able to make it so. But in addition to forgiving it please file an issue on the project’s issue tracker - unless the issue similar to the observed one has already been submitted.
Quentier supports encryption and decryption of note fragments, including both modern encryption used by Evernote - AES algorithm - and the legacy encryption algorithm - RC2. Unlike Nixnote 2, Quentier doesn’t require Java for that: the encryption/decryption algorithms from OpenSSL are used instead. A side note for Mac users: Apple’s SSL implementation doesn’t have these algorithms, that’s why OpenSSL from Homebrew or Macports (or some custom OpenSSL build) is required to build libquentier and Quentier on Mac.
Features present in official Evernote apps but not in Quentier
There are lots of them. Just about every single feature but the simplest notes, notebooks, tags and saved searches management is not implemented at this moment. Several features existing in Evernote look interesting so they might be added in future, for example, embedded PDFs within the note editor or import folders functionality. However, I won’t like to give the precise list of features planned for implementation in future as that would depend on a lot of things - on the degree of public interest to Quentier, on the amount of votes for this or that particular feature, on the technical difficulty to implement such a thing and on other factors.
Hopefully this post gives you some idea about what Quentier is capable of right now. If you’d like to know more, give Quentier a try and evaluate its capabilities yourself.
Dec 7, 2017
This blog is dedicated to Quentier — an open source desktop note taking app which can be used as Evernote client or just for local note taking without the necessity to even have the Evernote account. Quentier is free software distributed under the terms of GNU GPL v.3. The core functionality of Quentier is encapsulated in libquentier library which is distributed under the terms of GNU LGPL v.3.
Let me briefly introduce myself as the author of Quentier: my name is Dmitry Ivanov, I’m a 29 years old software developer from Saint-Petersburg, Russia. I bet I’m not (yet) known to the free software community as my contributions to free software in the past were quite limited. Quentier is my “pet project” on which I’ve been working in my free time for several last years. There is no any company or organization behind the project.
Here’s how Quentier looks like:
With Quentier you can read, modify, search and create notes, put them into notebooks, label them with tags, create and manage saved searches. If you are using Quentier for working with Evernote account, you can also synchronize with Evernote service - download the data into Quentier’s local storage, work with the content and then send changes back to Evernote. With Quentier it is absolutely possible to create and edit content offline and synchronize it with Evernote later.
Compared to official Evernote clients for various platforms, Quentier is a rather minimalistic one: it doesn’t have many advanced features such as import folders or PDF reader embedded into the note editor or the possibility to e-mail notes right from the app. Some of such advanced functionality might (or might not) be added to Quentier in future. However, there are some notable already supported features required for proper working with already existing notes: for example, Quentier properly supports encryption and decryption of note fragments supporting both current encryption method used by Evernote - AES - and the older legacy one - RC2.
Quentier maintains most of the account’s content within a local SQLite database which allows for convenient and efficient searching of stuff. Quentier fully supports Evernote search syntax as internally it is translated into SQL queries.
More details on what Quentier can and cannot do and how it works will be revealed in future posts so stay tuned. The rest of this post is dedicated to project’s history and attempts to foresee and answer some questions expected from newcomers.
The Quentier project was open sourced only in late 2017 although it was started long before that, in the middle of 2013. At that time I had the following situation in my life — it was about half a year since I decided to abandon the PhD program I was participating and about a year since I got permanent job of a junior software developer. My education had little to do with software development, I was a theoretical physicist and just did some mathematical modeling in Fortran. Shortly before my graduation one of my university teachers moved to a rather young company to start a new department there and he offered me to become his assistant. The job had no connection to physics at all but it was connected to mathematical modeling so I agreed. I was working part time for about a year as after my graduation I entered the PhD program. But that program didn’t work out well for me so I quit it at some point and decided to start working full time. My employer agreed under condition that I’d take some purely programming tasks not involving math in addition to my previous duties.
Shortly after starting to work on purely programming tasks I realized I lack the expertise required to solve such problems efficiently and decided to learn programming to become a more proficient developer. I started to read various books on software development but I felt it was not enough – I needed practice as well as theory and the practice I had at work wasn’t quite enough since it was mostly about maintaining already existing working code and I tried really hard to change it minimally to not break things. So I decided to start some hobby project to work on in my free time – such project could serve as a playground for various ideas on software design which I read from books and articles as well as the ongoing source of learning various things which I’d need to master for the project’s completion.
Many people finding themselves in a similar situation seem to settle with small projects like various ToDo lists or small scripts or something similar. Other folks go for various exercises which can be found in great numbers on the Internet. Others go further and take some programming courses. I didn’t want to participate in any courses but wanted to build something mildly complex and actually useful myself. That desire was backed by my introduction to Linux and the world of free software which happened in 2012. I became very enthusiastic about the ideas of free software and wanted to participate in its development somehow. So I did intend to open source my pet project if it ever reaches usable state.
By the time I switched my home computer from Windows to Linux (in 2012) I already used Evernote service – I didn’t use it very often or very much but I found it very convenient for note taking and syncing across several computers. So when I found out there is no official Evernote client for Linux, it was a disappointment. I tried Everpad and Nevernote (or Nixnote 1, the Evernote client in Java with Qt bindings) but neither seemed good enough for me. So after some thought I decided to devote my pet project to the creation of something like Evernote client for Linux myself. You can judge by that decision how much “junior” I was at the time as I could not even roughly estimate the scale of the task. If I realized how huge it was back then, you would have probably never heard of Quentier as it won’t have ever been even started.
Coincidentally around the time I decided to start Quentier project I also started to tinker with the Qt framework. At work I developed things in C++ but no Qt. I learned about Qt framework’s existence somewehere on KDE forums and decided that’s just what I need for writing GUI apps in C++ which would also be cross-platform.
So the pet project’s technological set was mostly determined – Qt and C++. I need to master C++ because that’s what I code in at work and I need Qt if I want to make nice cross-platform apps. One other piece of technology I learned about from watching the KDE project was CMake build system. From a brief look it seemed much more powerful than qmake so I decided to learn and use it.
One might ask why I didn’t come to help build Nixnote 2 instead as it also used Qt and C++. The answer is simple – I had no idea of Nixnote 2’s existence. I’ll return to discussing Nixnote 2 a bit later in this post.
So in the second half of 2013 I created a private repository on bitbucket and started to tinker with the official Evernote C++ SDK and its dependencies trying to put something together. I had little idea of how to structure whatever I was building so for the first 7-8 months I just did random things like the main window’s UI created in Qt Designer, some basic note editor based on QTextEdit and QTextDocument and various other small things. After I realized I have no idea where I’m going I decided to put the code aside and try to come up with some high level architecture which I would then implement piece by piece. After some thought I figured there are just three large required components interacting with each other:
- Local storage
- Synchronization
- GUI
Fortunately, by that time I learned some basics about multithreading and figured that operations with local storage and synchronizaton should be done in background threads and not block the UI thread. So the threading model was also quite simple initially: local storage controller runs in its own thread, the synchronization controller also runs in its own thread and they communicate with each other and with GUI asynchronously, by sending data via signals and slots.
Once that concept was worked out, I started to implement the local storage part. Quick googling revealed the industry standard for embedded databases is SQLite so I read a book on SQL basics in context of SQLite and got to coding. Fortunately, I was aware of QtSql module’s existence which simplified the coding of database management for me.
Shortly after I started to implement the local storage component I learned about the existence of QEverCloud – the amazing Qt-friendly replacement for the official Evernote C++ SDK which was quite a pain to use – first, it had a fair share of dependencies including thrift library, some boost parts, libevent and something else which I don’t even remember now; second, the use of the official Evernote C++ SDK involved a lot of conversions between std::string and QString which was of course nothing good. I rejoiced and converted my project to use QEverCloud.
A little later, when about 60% of the known work on the local storage was done, I occasionally learned about the existence of Nixnote 2. It felt to match exactly the niche of my project and even used the same technological stack – C++ and Qt. I was very disappointed and considered shutting my project down and switching to doing something else. For a couple of weeks I ceased the development of Quentier and tried to use Nixnote 2. At that time – mid 2014 if I remember correctly – it was quite buggy. Out of curiosity I decided to look at the source code and find the origin of some bugs which prevented me from using the app normally. I have properly traced the roots for a couple of issues and even contributed a simple fix for one bug. I saw a lot of interesting things within the source code of Nixnote 2 about the existence of which I had no idea previously. One thing which later affected the development of Quentier was the use of QtWebKit as the note editor’s backend. My previous attempts to build the note editor were focused on employing QTextEdit and QTextDocument for that and there were quite several problems which I wasn’t sure how to handle, for example, what to do with HTML elements which QTextDocument doesn’t support but which might appear within Evernote’s notes – there are not many such elements but they exist so just ignoring them was not an option. Furthermore, it was unclear how to embed the resources (attachments) within the note’s text. QtWebKit solved both mentioned problems nicely – being the browser engine it supported HTML much better out of the box + there was a nice piece of API for the insertion of custom widgets into the page – web plugins. That was a perfect match for displaying of attachments embedded into notes.
I need to take a brief stop here to tell about my opinion and impression on Nixnote 2 and its author. I greatly admire the time and effort put into the development of Nixnote 2 by its author, baumgarr. He was also the author of “Nixnote 1” also known as Nevernote – the free open source Evernote client implemented in Java with Qt bindings. Its first version was announced in late 2009 and for all these years till now baumgarr has been devoting his free time and effort into building Nevernote and then Nixnote 2. The years of dedicated volunteer job deserve a lot of respect.
However I must confess that I consider several engineering solutions implemented in Nixnote 2 corner-cutting shortcuts and oversimplifications for the increased speed of development. I’ll mention some of them here, for completeness:
- The first such shortcut is the use of
QSqlTableModel and relatives. These Qt classes are indeed very convenient but they talk to the SQLite database synchronously, in the UI thread. For large enough databases that has the potential to totally screw up the performance.
- The second shortcut is the use of global variables. Nixnote 2 has a special class “globals” which mostly consists of a bunch of different app settings. It is used a lot across the whole code of the app. Everybody knows why global variables are bad – they tighten the binding between components and thus increase the potential for the code to become spaghetti.
- The third shortcut is the ad-hoc style of conversions between ENML and HTML representations of the note. The conversion is basically just a linear search and replace of some pre-specified markup fragments. The proper approach as I see it should involve iterating over the DOM tree of the HTML document and working with its elements, attributes and their contents. That is what I implemented in libquentier (the core library of Quentier). I did it using the conversion of HTML to a valid XML and then using Qt’s standard XML reading/writing facilities. Nixnote 2 could do the same because it also uses HTML tidy – the tool capable of making HTML a well formed XML. Speaking of which, originally Nixnote 2 used the tool via launching it as another process which is not quite as performant as making library calls – several months ago such option was added to Nixnote 2.
I could continue this list but I’d stop here as that’s enough to briefly represent my view on Nixnote 2’s engineering issues. Despite these issues Nixnote 2 has nevertheless become successful – it has been included into Debian which does mean something in my opinion. Currently it is much more stable and usable than it was years ago.
Returning back to my story, I decided to continue the development of Quentier. Beyond the lack of ensureness in Nixnote 2’s success the determining factors in my decision were the following:
- For the end user of the software it never hurts to have a choice so the existence of Nixnote 2 doesn’t mean Quentier won’t be needed by anyone ever.
- Quentier still nicely plays the role of a playground project for self-learning.
- I also realized that having a finished pet project capable of doing something useful would be a very nice portfolio item should I decide to change job.
I’d like to specifically note that I decided to not copy-paste any code from Nixnote 2 even though it was written in C++ and used Qt. The rationale was the following:
- Nixnote 2 is licensed under GPL and I wanted to have the core library licensed under LGPL.
- If I start to copy-paste someone else’s code, that would diminish the self-learning role of the project.
I learned a lot from viewing the progress of Nixnote 2 – I watched its GitHub repository, saw problems which users encountered and features they wanted and suggested. It taught me a lot and some of that knowledge was shamelessly used in Quentier project.
Shortly after my decision to continue the work on Quentier despite the existence of Nixnote 2 I learned that the original author of QEverCloud library decided to resign from maintaining it. As by that time a lot of my code depended on QEverCloud I decided to volunteer becoming the next maintainer. I got the blessing from the original author as well as the code used to produce the auto-generated headers and sources of QEverCloud – QEverCloudGenerator. One thing I felt QEverCloud is lacking is the ability to be used as a shared library so I added such support. Another thing I did was the switch from qmake build system to CMake.
A major milestone in Quentier development was finalizing the local storage management and covering it with unit tests. The coverage is still not 100% but it is rather good. The hardest part of the entire development, I think, was implementing the Evernote search syntax support within the local storage. I guess finishing it (and covering with tests) was the absolute point of no return after which the sunk cost psychology would not let me cease the development no matter what happens.
The next thing to implement after the local storage which I chose to do was the note editor. I started it from scratch using QtWebKit as the backend. As a lot of stuff about HTML, CSS and JavaScript was new to me, I progressed quite slowly and had to read a lot of literature to make myself familiar with the basics of these technologies. I’ve even read David Flanagan’s “Javascript. The definitive guide” – a huge manuscript of ~1500 pages covering a whole lot of information. After several months of work I had some basic note editor with support for resources (attachments to notes) and simple actions like font size/family adjustment and stuff like that. I should have probably stopped at this for the first version but I didn’t. Instead I decided to implement smart undo/redo support for the note editor and some other fancy things like the support for resizable table columns. It all took several more months of work, involved a fair share of scripting but the end result got me really proud.
Unfortunately, there was another disappointment waiting for me just around the corner: Qt decided to deprecate QtWebKit module in favour of newish QtWebEngine. The more I learned about the differences between the two web modules the more frustrated I became: QtWebEngine was almost entirely asynchronous unlike the synchronous QtWebKit but much worse was another fact: the entire web plugin based API was missing in QtWebEngine. The official statement was like “with HTML5 nobody needs web plugins anymore”. Aha, sure. Probably I should have just ignored that deprecation but I once again couldn’t resist the challenge and spent several more months supporting QtWebEngine backend in addition to QtWebKit. For QtWebEngine I replaced web plugins with programmatically generated resource (attachment) representing images which were also additionally scripted to catch the clicks on “Open” and “Save” buttons rendered on them.
As a result of supporting both QtWebKit and QtWebEngine the source code of the note editor has become the messiest code of the entire project. It is full of ifdefs splitting the pieces of logics required for different backends plus I did a lot of things via JavaScript even when QtWebKit and QtWebEngine had some incompatible C++ APIs for them – they were too different + most C++ APIs for QtWebEngine appear only in the latest and greatest versions of Qt5 while I wanted to keep compatibility with as many Qt versions as possible.
The rest of Quentier’s development after the note editor was much less dramatic which was very fortunate for me since I started to get really tired of all these unexpected issues. I implemented the synchronization logics but before I could test it properly I needed to implement the rest of UI components and piece them together to form the bulk of the app which one can interact with. I decided to use Qt’s model-view framework for lists of notebooks, notes, tags etc. Notebooks and tags are actually represented by tree models: notebooks can be nested into stacks + they can correspond to linked notebooks instead of user’s own account; tags can be nested into each other + they can also come from linked notebooks’ notes. Implementing models and some custom delegates took several months but it was worth it: now I feel like QAbstractItemModel is my best understood part of Qt framework.
I first compiled the pieces together into an app in the beginning of 2017 and the rest of the year was spent on implementing various small missing pieces of functionality and troubleshooting. Finally the whole thing was published on GitHub.
Looking back now I can see the history of Quentier project is full of operational mistakes: I should have studied the landscape better and found out about the existence of Nixnote 2 much earlier, ideally before I started to tinker with anything. I should have invested more effort into building the high level design of the app in the very beginning of the project. Finally, once I had some blueprint I should have probably started to develop things in public – that might have attracted people with good suggestions and skills. If I ever start any open source project again, I’ll definitely try to avoid the same mistakes. Hopefully someone would be able to avoid such mistakes after reading about my experience.
A logical conclusion to this post would be some estimation about the future of Quentier project. I plan to continue working on it but I might have to slow down a little because I’ve accumulated some “technical debt” in my life during several previous years of development and I need to “pay” it now. I really hope someone would join the development, at least in the form of bug reports and maybe patches. I would also enjoy to see someone willing to work on some new functionality and improving the existing one as well. So what I definitely intend to do is to make the project as developer-friendly as possible: write more developer docs, especially the introductory ones + factor out some “junior jobs” and mark them appropriately. Then time will tell whether there’s any public interest in Quentier: if the project manages to attract both developers and users, it’s development would most likely continue even if I choose to step aside (although right now I don’t have such plans).
Also one more note about Quentier’s potential connections with Nixnote 2: even though playing on the same field makes us competitors, I’m not really a person who is into competition. I would much rather collaborate than compete. I think the appearance of Quentier is good for Nixnote 2 since it can definitely take some pieces from it, for example, the C++ code for encrypting/decrypting the note fragments. Currently Nixnote 2 still requires Java only for that functionality. To foresee the next question, I don’t think it would be possible to merge the two projects together: after all, they are very different architecturally. But I think these two projects can definitely become good neighbours.
I guess that’s more than enough for the introductory post. I plan to write more on many things which I feel should be communicated so stay tuned.